I have been downsizing my scrapbook supplies a lot! So as I have been doing so I consider that there are things that I need to keep and things I don't! Here is a tip that I think is helpful when you are using glue. If you do not want to get glue all over your table save the backs of paper pads. The cardboard will cover your work space and you can throw it out when you are done!
Happy Friday!
Deb♥

Showing posts with label Friday Frugality. Show all posts
Showing posts with label Friday Frugality. Show all posts
July 12, 2012


June 21, 2012
Friday Frugal tip by Groovy Deb


Guest Designer Groovy Deb has a frugal tip for today :)
I just have to share with you today how I saved my friends a lot of money last weekend We have a scrapbooking group that meets monthly to crop and on occasion we will bring in things we no longer need to see if others can use it. This time I brought a tote FULL of paper and I do mean full. At the least I would say there was 2,000 sheets there that I just did not need anymore. So even though the frugality did not help me financially it definitely helped others. It is fun to share and clean out a big space in my scrap room! Have a good day and hoping you enjoy!
Deb♥
March 8, 2012
Frugal Friday by Christy
Now it's your turn to take the March GREEN Challenge. The March Challenge is anything to do with GREEN. It could be a project using the color Green, or about being "green" - or you could use the word Green in your title. The possibilities are endless. Anything goes! So think GREEN and take the challenge. To participate in the March GREEN Challenge - just email a picture of your project along with a description to Scrappinpsycho@live.com All submissions will be posted to The Scrap Our Stash blog and on March 31st a winner will be chosen, and given the opportunity to be a Guest Design Team Member for the month of May. This challenge ends at midnight central time on March 31st.
In December, I participated in Tim Holtz' twelve tags of Christmas.While I did make many of the projects, I really never got around to sharing all of them. One of my favourite projects were these little metal tags he made using sheets of craft metal. I don't have any craft metal. What I did have were some soda cans. So, since march is about green things over at Scrap Our Stash, I thought this would be the perfect opportunity to finally share how I recycled the cans to make some very cool metal embellishments. How do soda cans relate to green things? Well, I am being green by recycling.See how one can twist a challenge around!!!
Anyway...you are going to need an old pair of kitchen shears. I keep a pair around just for the purpose of cutting thick cardboard and metal. Soda cans are your next item. Be sure to wash them out. I recommend letting them dry a bit too, or you may spill water all over your work space. Take a dry can and carefully cut a slit into it.

Now for the next part, you need to be VERY careful. The edge is a bit jagged you don't want to cut yourself. Also, as you cut, try to make slow, even cuts. This way, you reduce the chance of having metal shavings fall off. Insert your scissors into the slit and carefully cut the top off the can. You can use one hand to depress part of the can as you go, allowing the scissors to fit in the slit and cut more evenly.

Now that the top is off, cut a slit down one side toward the bottom. This will allow you to more easily cut and remove the bottom of the can.
 You will then have a somewhat curled sheet of metal.If one side it jagged, you may wish to trim the ends to leave a nice even cut. If it's damp, dry it a bit with a cloth. You can now die cut it or emboss it as desired. I chose to use my scissors and I hand cut a few tag shapes.
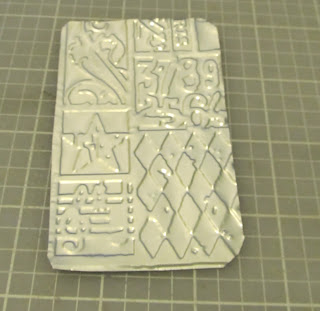 Once your metal piece has been embossed, you can begin paint it. I used acrylic craft paint. Some paints cover better than others. Experiment with different types to find the look you wish to achieve. I did find that some of the paint began to peel. This is ok. It will add to the grunge look you are going for. You also need not worry if your paint job is perfect. As you can see, mine is not totally even.
 Your next step is to sand down the tag. This will reveal some of the metal beneath it while leaving other areas covered. I used a nail file.
 Now, carefully wipe any dust off, then stamp over the metal tag with a distress ink pad. Then cover with clear embossing powder and heat. The result is a wonderful metal enamel embellishment. The clear embossing powder seals the paint in and prevents it from any further peeling.
 You can then choose to add additional embellishments to the tag.
In December, I participated in Tim Holtz' twelve tags of Christmas.While I did make many of the projects, I really never got around to sharing all of them. One of my favourite projects were these little metal tags he made using sheets of craft metal. I don't have any craft metal. What I did have were some soda cans. So, since march is about green things over at Scrap Our Stash, I thought this would be the perfect opportunity to finally share how I recycled the cans to make some very cool metal embellishments. How do soda cans relate to green things? Well, I am being green by recycling.See how one can twist a challenge around!!!
Anyway...you are going to need an old pair of kitchen shears. I keep a pair around just for the purpose of cutting thick cardboard and metal. Soda cans are your next item. Be sure to wash them out. I recommend letting them dry a bit too, or you may spill water all over your work space. Take a dry can and carefully cut a slit into it.

Now for the next part, you need to be VERY careful. The edge is a bit jagged you don't want to cut yourself. Also, as you cut, try to make slow, even cuts. This way, you reduce the chance of having metal shavings fall off. Insert your scissors into the slit and carefully cut the top off the can. You can use one hand to depress part of the can as you go, allowing the scissors to fit in the slit and cut more evenly.

Now that the top is off, cut a slit down one side toward the bottom. This will allow you to more easily cut and remove the bottom of the can.


December 8, 2011
Frugal Friday tip by Christy
Design Team Member Christy submitted this Frugal Friday Tip:
We are all attracted to it in some way or another. Sometimes, it's part of what inspires us to make the purchase. Companies pay top dollar to design it. What am I talking about? Packaging, of course! Sometimes, I am loathe to throw it out. There has to be some way to use it. Today, I am going to invite you to get out some of your punches the next time you open a new scrappy supply.
Recently, I acquired a Martha Stewart embossing button punch. I have been searching high and low for things to punch (other than patterned papers) to make buttons with. I also happen to have a very messy drawer full of recycled items I hope to use in the near future. The problem with the messy drawer is that I hate to open it and look at the mess. Thus, I rarely use anything out of it. I merely pop it open as fast as I can to shove something else in. So I resolved to actually use some of that mess. I figured that if the item became an embellishment (as I had intended it too) than I might be more apt to reach for it the next time I was scrapping. Armed with my button punch, I opened the drawer and pulled out some package bits.
 In November, I had acquired the Melody Ross chip art tool. I set aside the clear packaging portion to make ghost letters and homemade acrylic style shapes. The backing is a nice thick piece of chipboard. From it, I cut the bracket shapes outlined in yellow. These will be filed into my journal spots box. I can use them as is with the quotes intact or I can paint or cover the quotes to adapt them to some future page.
Now to punch some buttons from what's left. Parts of the packaging had lovely wooden patterns on it. That's where the buttons on the left came from. Other parts had flowers, birds and butterflies. Those would make some lovely buttons! However, the chipboard is too thick for my punch. So, I decided to peel away the chipboard layers. To loosen the layers, I took my paper piercer to a corner and separated the edges.
 Once the corner is started, you can carefully peel away the layers. I did my best to peel it in half. This made thinner chipboard which my punch could handle and also allowed me to punch images from the front and back of the package.
 Try to plan out where you want to punch. I cut away the unwanted parts of the back which had words and the sku number. This made it easier to punch the parts of the image I wanted.
 As you can see, these made some nice embellishments. If you don't have a button punch, try using one of your own favourite punches.
Now it's your turn to go use that packaging - send an picture along with a description to Scrappinpsycho@live.com and we will post it here.
Do you have a frugal idea to share? Send your tip along with a picture to Scrappinpsycho@live.com . You could be featured as a future Frugal Friday Tip.
We are all attracted to it in some way or another. Sometimes, it's part of what inspires us to make the purchase. Companies pay top dollar to design it. What am I talking about? Packaging, of course! Sometimes, I am loathe to throw it out. There has to be some way to use it. Today, I am going to invite you to get out some of your punches the next time you open a new scrappy supply.
Recently, I acquired a Martha Stewart embossing button punch. I have been searching high and low for things to punch (other than patterned papers) to make buttons with. I also happen to have a very messy drawer full of recycled items I hope to use in the near future. The problem with the messy drawer is that I hate to open it and look at the mess. Thus, I rarely use anything out of it. I merely pop it open as fast as I can to shove something else in. So I resolved to actually use some of that mess. I figured that if the item became an embellishment (as I had intended it too) than I might be more apt to reach for it the next time I was scrapping. Armed with my button punch, I opened the drawer and pulled out some package bits.

Now to punch some buttons from what's left. Parts of the packaging had lovely wooden patterns on it. That's where the buttons on the left came from. Other parts had flowers, birds and butterflies. Those would make some lovely buttons! However, the chipboard is too thick for my punch. So, I decided to peel away the chipboard layers. To loosen the layers, I took my paper piercer to a corner and separated the edges.


Now it's your turn to go use that packaging - send an picture along with a description to Scrappinpsycho@live.com and we will post it here.
Do you have a frugal idea to share? Send your tip along with a picture to Scrappinpsycho@live.com . You could be featured as a future Frugal Friday Tip.
May 12, 2011
Frugal Friday tip-Make your own baker's twine.

Baker's twine is showing up in everything lately, but it's hard to find and it's not very cheap! I wish that I could say that this was all my idea, because I love that I can make it with stuff on hand. But I saw a video on YouTube by UKmaryanne and followed her directions.
First start by protecting your ruler. I wrapped mine with a piece of cardstock and then taped it off. Next take some white cotton yarn and wrap it around your ruler and slide it together but don't let it overlap. Use your Copic, ProMarker, Prismacolor, or another marker to make lines on the yarn. I tried a Sharpie, but it didn't put out enough ink to soak through to the other side of the yarn. My Copic worked great.

Once it's dry, unwind it and it's all done! It's not a perfect match, but I love the fact that it's free!
Do you have a frugal tip to share? Just send your tip along with a picture to scrappinpsycho@live.com and your tip could be featured as a future Frugal Friday Tip.
Be sure to scroll down the page - Scrap Our Stash posts something new everyday.
April 7, 2011
Frugal Friday Tip by Christy
Phrases Can Be More Than Meet the Eye
The answer arrived while making my latest page. It's probably not new to some, but it's new for me. I could simply cut the word apart and use sections of it in the title!
Using the rub-ons and a variety of letter stickers made the title more interesting and allowed me to use up an otherwise unusable item in my stash. I invite you to also think a little more out of the box with the words and phrases in your stash. You just might like what you end up with. If you use this tip - please share the results with us here at Scrap Our Stash. Send a picture along with a description to scrappinpsycho@live.com. We will post your project here.
Do you have a frugal tip you'd like to share. Send your tip along with a picture to scrappinpsycho@live.com. You could be featured as a future Frugal Friday Tip.
Every so often, the kits I choose come with a pre-made word or phrase that I find difficult to use. These will often then sit, unused, as I don't have a clue what to do with them. In this particular case, I had the word "girly" in the form of a rub-on. There is nothing really girly in my house (other than me and my female cat). Everything else is well...very much male dominated as I have a son, my wonderful husband and 2 other male pets. So the question was " when will I ever use this?!?"
 |
| Crate Paper Seasons rub-ons |
 |
| Scraphappy.org March Inspiration Scraplift of Maggie Holmes' " I Absolutely love your Laugh" |
Do you have a frugal tip you'd like to share. Send your tip along with a picture to scrappinpsycho@live.com. You could be featured as a future Frugal Friday Tip.
December 16, 2010
Frugal Friday - Recycling Bags by Ren-Yi
Design Team member Ren-Yi submitted this Frugal Friday Tip. She said, "I made this bag for an Embellish Challenge but there is a Frugal-tastic Element to it: Recycling.
I had saved this William Sonoma bag from a purchase since its form factor was so unique.
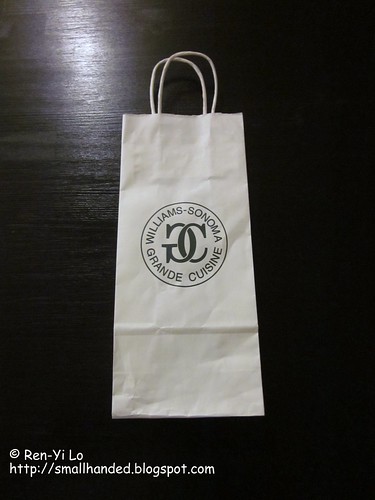
Slender, tall - perfect for a wine bottle. I also tend to save things and want to refurbish it and never get around to it ;) Also known as pack rat behavior. So this challenge was the perfect motivator. So with the color combo poster, I went to town. Thanks, Embellish!
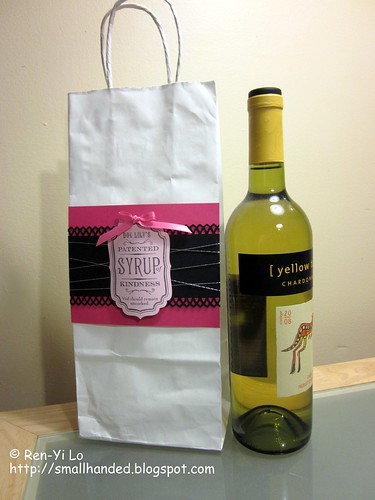
Here's an up-close look of the bag's label. Don't you love Waltzingmouse Stamps Rescue Remedies? The "Syrup of Kindness" makes the perfect label for a wine bottle.
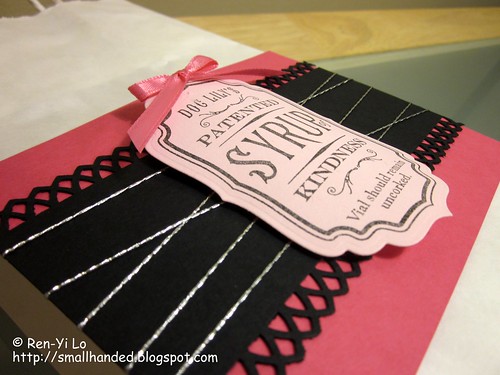
The wine gift bag would make a good hostess gift and not so much of a host ;) Do you have examples on how to revamp your purchase bags into gift bags? If so, let's see 'em. Send your example to scrappinpsycho@live.com and we will post it here. Or, do you have a frugal tip to share - email a picture and a description, you could be featured as a future Frugal Friday Tip.
I had saved this William Sonoma bag from a purchase since its form factor was so unique.
Slender, tall - perfect for a wine bottle. I also tend to save things and want to refurbish it and never get around to it ;) Also known as pack rat behavior. So this challenge was the perfect motivator. So with the color combo poster, I went to town. Thanks, Embellish!
Here's an up-close look of the bag's label. Don't you love Waltzingmouse Stamps Rescue Remedies? The "Syrup of Kindness" makes the perfect label for a wine bottle.
The wine gift bag would make a good hostess gift and not so much of a host ;) Do you have examples on how to revamp your purchase bags into gift bags? If so, let's see 'em. Send your example to scrappinpsycho@live.com and we will post it here. Or, do you have a frugal tip to share - email a picture and a description, you could be featured as a future Frugal Friday Tip.
October 28, 2010
$$Frugal Friday Tip$$


Guest Design Team Member Denise submitted this frugal tip of using scraps to create cards.
She said "I cut the pieces up into various pieces for a 4x6 card. Here’s where I use my punches. I also ink up all the pieces once this is done.
After I’ve cut it all up, I stamp sentiments and images on the pieces of cardstock and add some embellishments from my stash of embellishments. These are embellishments that are extras from kits etc.
Here’s how my cards came out.

So I enjoyed a funny movie and have some fun notes to send off to my friends and family J.
Hope you’ll give this a try!
August 26, 2010
$$Frugal Friday Tip$$
Do you have any old planners lying around? I did! I found this old planner in my book storage and decided to make it into something new!


If you create a planner using Rachel's suggestions - please send a picture to scrappinpsycho@live.com. We'd love to share it here on the blog.
Do you have a frugal tip you'd like to share? Just send your tip along with any pictures to scrappinpsycho@live.com. You could be featured as a future Scrap Our Stash Frugal Friday Tip.

Rather than pay to get a wedding planner/agenda thing I decided to take the planner I found out of the plastic cover and make my own!

You can either cover the existing pages with new paper and work from there, or if you have a binding machine, make your own inserts.
With what you have in your stash you can make your own planner, organizer, or a mini album!!! Look around!

If you create a planner using Rachel's suggestions - please send a picture to scrappinpsycho@live.com. We'd love to share it here on the blog.
Do you have a frugal tip you'd like to share? Just send your tip along with any pictures to scrappinpsycho@live.com. You could be featured as a future Scrap Our Stash Frugal Friday Tip.
August 19, 2010
$$Frugal Friday Tip$$

Guest Design Team Member Malina submitted this Frugal Friday Tip:
Flowers just seem to be the perfect embellishment to finish or save a layout. When in doubt put a flower or two out :) But flowers purchased at the store can get pricey and if you are like me you will want lots of color choices available to you in bling and without bling which means buying more for your stash. And while I do enjoy making various flowers from time to time they can be time consuming and not easy to reach for in a pinch when I just need that something.
So I have begun stashing inexpensive white paper flowers instead of colored ones. I can often pick up a pack of 2 dozen in varied sizes for $1.00. Then when I need one I reach for my Smooches, Stickles or my Chalk & Pigment eyes from Color Box. And since I seem to always have young girls around nosing through my stash for that 'something' they need it stretches my stash just a bit further.
Do you have a frugal tip to share? Send your tip along with a picture to scrappinpsycho@live.com. You could be featured as our next Frugal Friday Tip.
Don't forget to take the August Flower Challenge and the "Pagerize This" Challenge - all the details are below.

May 20, 2010
$$Frugal Friday Tip$$

Clay Buttons by Jamie
I saw Jamie's post on these buttons and thought they would make a great Frugal Friday Tip. This is what Jamie posted on her blog "I was at Joann's the other day and they had Transparent Fimo on clearance for $0.97 for the big bundles! Just $0.97! I haven't worked much with clay (unless play-doh counts!) but I have always been intrigued by it - so how could I possibly pass up this deal! We all know that we can't use coupons on sale/clearance items...which would explain the "pasta maker" now sitting on my art table! Now that I have the clay and I can make it all the same thickness what else could I do but make BUTTONS!
Of course, these are just my first attempts but I am really enjoying it! I baked them for 30 minutes at 230 degrees and then grabbed my Copic Sketch Markers, my air compressor, and my Copic airbrush kit and started playing! After I got them 'painted' I took them outside and placed a coating of acrylic sealer on them and let them dry! How cool is it that you can match buttons exactly to the color of your Copic colorings! Yep - I will definetly be making more...lots more! Check out Jamie Lane's blog for even more buttons.
Do you have a frugal tip you'd like to share? Just email the tip - along with pictures to scrappinpsycho@live.com . We'd love to share it. If you complete a project using this or any of our other Frugal Friday Tips - please share it - we'd love to post it here.
Don't miss our May "Get out of your Box" Challenge or our Scrap Our Stash Sketch Challenge. See all the details below.
May 6, 2010
$$Frugal Friday Tip$$
DIY Pop Dots by Rachel
 You will have a small piece of cardstock such as this, apply the piece of cardstock to the desired surface:
You will have a fabulous popped up flower

If you use this or any other Scrap Our Stash Frugal Tip please share your project. We would love to post it here. If you have a frugal tip you'd like to share - please send pictures and a description to scrappinpsycho@live.com. You could be featured as our next Frugal Friday Tip.
Last week I found myself without any foam pop dots and I de cided to make my own. Here is how I did it: Two strips of cardstock with adhesive:
 cided to make my own. Here is how I did it: Two strips of cardstock with adhesive:
Fold the cardstock on itself until you reach the desired t hickness:
 hickness:You will have a small piece of cardstock such as this, apply the piece of cardstock to the desired surface:
You will have a fabulous popped up flower

If you use this or any other Scrap Our Stash Frugal Tip please share your project. We would love to post it here. If you have a frugal tip you'd like to share - please send pictures and a description to scrappinpsycho@live.com. You could be featured as our next Frugal Friday Tip.
April 15, 2010
$$Frugal Friday Tip$$
Faux stitching by Pinky


Faux stitching is so fun and looks great on any page, I would love to share this technique with you.
*Picture 1*
If you don't have a sewing machine or don't want to drag it out, this is the perfect solution.
Just take your pattern tracing rotary wheel (inexpensive in any craft shop)
*Picture 2*
run it back and forth along the paper until it leave an even indentation.
I would do this 2 or 3 times for ribbon and 1 or 2 times on paper.
After you can visibly see the dots, take your handy craft pen (any color will do) I used my sharpie fine point, and run it along the stitching lines.
You can tell the difference between stitching and faux stitching BUT only when you are very close!
*Picture 4*
Perfect for ribbon, paper, any crafty medium!
You can find my video tutorial here
And many more tutorials, tips, and ideas on my blog
Thanks for sharing the crafty love with me today!
~Pinky~
Now it's your turn to try this cool tip - we'd love to share your results. Just send a picture and a brief description to scrappinpsycho@live.com and we'll post it here for everyone to see.
Do you have a frugal tip you'd like to share? Email the tip along with pictures to scrappinpsycho@live.com. Your tip could be our next featured Frugal Friday Tip!
Also, don't miss our April Lift Challenge - see all the details below.


*Picture 1*
If you don't have a sewing machine or don't want to drag it out, this is the perfect solution.
Just take your pattern tracing rotary wheel (inexpensive in any craft shop)
*Picture 2*
run it back and forth along the paper until it leave an even indentation.
I would do this 2 or 3 times for ribbon and 1 or 2 times on paper.
After you can visibly see the dots, take your handy craft pen (any color will do) I used my sharpie fine point, and run it along the stitching lines.
You can tell the difference between stitching and faux stitching BUT only when you are very close!
*Picture 4*
Perfect for ribbon, paper, any crafty medium!
You can find my video tutorial here
And many more tutorials, tips, and ideas on my blog
Thanks for sharing the crafty love with me today!
~Pinky~
Now it's your turn to try this cool tip - we'd love to share your results. Just send a picture and a brief description to scrappinpsycho@live.com and we'll post it here for everyone to see.
Do you have a frugal tip you'd like to share? Email the tip along with pictures to scrappinpsycho@live.com. Your tip could be our next featured Frugal Friday Tip!
Also, don't miss our April Lift Challenge - see all the details below.
April 8, 2010
$$Frugal Friday Tip$$
Embelishment Packages as Embelishments by Danielle

Design Team Member Danielle submitted this thrifty Frugal Friday tip. She said she always keeps the inserts from embellishment packagings as they may make good embellishments themselves.
On this layout, she used the backing from a set of Prima embellishments. It was already 4 inches high, so it worked perfectly with the size of her photo. She simply cut the length down to size and glued it down next to her photo using the scalloped edge as an added detail. She suggested that you could also journal on the card if desired.
Clever idea! If you complete a project using this tip please send a picture and description to scrappinpsycho@live.com and we will post it.
If you have a frugal tip you would like to share - please submit the idea and a picture to scrappinpsycho@live.com. It may be our next Frugal Friday Tip!

Design Team Member Danielle submitted this thrifty Frugal Friday tip. She said she always keeps the inserts from embellishment packagings as they may make good embellishments themselves.
On this layout, she used the backing from a set of Prima embellishments. It was already 4 inches high, so it worked perfectly with the size of her photo. She simply cut the length down to size and glued it down next to her photo using the scalloped edge as an added detail. She suggested that you could also journal on the card if desired.
Clever idea! If you complete a project using this tip please send a picture and description to scrappinpsycho@live.com and we will post it.
If you have a frugal tip you would like to share - please submit the idea and a picture to scrappinpsycho@live.com. It may be our next Frugal Friday Tip!
December 17, 2009
$$Frugal Friday Tips$$
There is Snow Place Like Home for the Holidays by Danielle

 Danille used the leftover clear plastic packaging from some embellishments to create her acrylic snowflakes. She cut snowflakes out of the plastic packaging with her Sizzix die cutting machine. This technique could be done with most manual die cutting machines, and if the packaging is thin enough, you may even be able to use a punch. You just have to experiment with it.
Danielle then glued the snowflakes to her page and covered them with Crystal Stickles. Her goal was for the layout to have the feel of a snow globe, with snowflakes falling all around. Which she did achieve with her recycled “faux” snowflakes.
Danielle said "this is a good way to save money by using something that you would normally have thrown away". Who would have ever though that something so beautiful could be created with "trash". This technique could also be used to cut out "ghost letters" for a title. The possibilities are endless.
If you would like to share a project with us in which you used this technique just email it with a brief description to Scrappinpsycho@live.com marked Frugal Friday sample and we will post it for others to enjoy.
If you have a Frugal tip you would like to share - send the tip along with pictures to Scrappinpsycho@live.com marked Frugal Friday Tip and your idea could be published here.
 Danille used the leftover clear plastic packaging from some embellishments to create her acrylic snowflakes. She cut snowflakes out of the plastic packaging with her Sizzix die cutting machine. This technique could be done with most manual die cutting machines, and if the packaging is thin enough, you may even be able to use a punch. You just have to experiment with it.
Danielle then glued the snowflakes to her page and covered them with Crystal Stickles. Her goal was for the layout to have the feel of a snow globe, with snowflakes falling all around. Which she did achieve with her recycled “faux” snowflakes.
Danielle said "this is a good way to save money by using something that you would normally have thrown away". Who would have ever though that something so beautiful could be created with "trash". This technique could also be used to cut out "ghost letters" for a title. The possibilities are endless.
If you would like to share a project with us in which you used this technique just email it with a brief description to Scrappinpsycho@live.com marked Frugal Friday sample and we will post it for others to enjoy.
If you have a Frugal tip you would like to share - send the tip along with pictures to Scrappinpsycho@live.com marked Frugal Friday Tip and your idea could be published here.
It's still not to late to submit your December Scrap Challenge - see details below.
Subscribe to:
Posts (Atom)