

(and sorry that my mat is so dirty...it's very heavily used!!)

2) Cut slits fairly thin all the way down the length of the strip and be sure to go pretty deep, but careful not to cut all the way through!

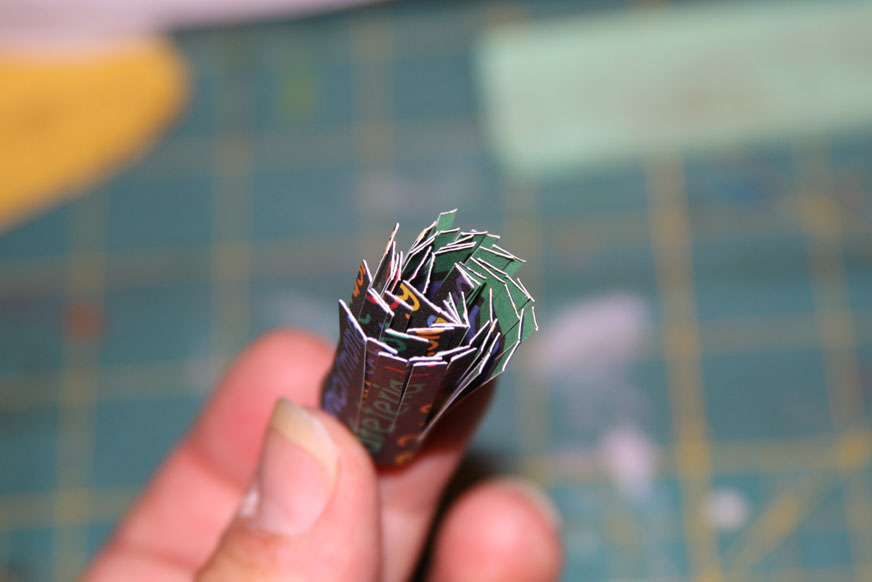
This is what it should look like:

3) Start at one end and roll the strip until you get to the end...(do not adhere yet)
If you did not use double sided paper be sure the pattern that you want is on the inside that you are rolling into the inside (I rolled my stripes inside)


7) Set the flower down on your table (fringe side up) and start opening the fringes with your fingers..

8) Keep opening until you get it all opened up and how you want it...you can even crumple it a little if you want. (I didn't crumple mine)

Here is a smaller flower on the left that i did and the larger one in the tutorial on the right. I used a stripe paper so you could get a good visual of the process.

Now it's your turn to take the challenge. You can either submit a project using any kind of flower or you can submit a project using one of the flowers shared in the tutorial. Just send a picture along with a description of your project to Scrappinpsycho@live.com. You could be chosen as a Guest Design Team member. See all the details in August Challenge below.
Joni,
ReplyDeleteYou layout is fabulous!!!!!
I love the circle and beautiful flowers.
Thanks for this tutorial!!!
Love how you made your flowers. I will definitely be making these! Your layout is awesome!
ReplyDeleteI've never seen flowers like this before! I love the way they look...not too girly. Perfect for us that only have boys! :)
ReplyDeleteI forgot to mention this in the post...but yes..these are good for "boy" flowers.... my son calls them "fireworks" -- sounds good to me! (and they're easy to make!!)
ReplyDeleteThese flowers are sooo cute and I love the paper you chose. The whole layout is great. Thanks for sharing. I must try this!
ReplyDeleteI love these flowers! Thank you for the great tutorial. I am definately going to have to try these. I love your LO too!
ReplyDeletewow - i love your flower. what a great concept! and the tutorial was just superb and easy to follow.
ReplyDeleteThanks for the great tutorial. I might just have to try this one! Great layout too.
ReplyDeleteThese flowers are just so much fun!
ReplyDeleteVery cool flowers!! I agree these would be perfect for a boy page too! Thanks for the directions, I will try them sometime!
ReplyDeleteBeautiful lo, Joni! Great idea for the flowers, I must try it.
ReplyDeleteTFS!