Now it's your turn to submit a flower challenge. See all the details in August Challenge below.
August 13, 2010
August Challenge
Now it's your turn to submit a flower challenge. See all the details in August Challenge below.
August 12, 2010
Frugal friday Tip- Bottle Cap Flowers
Design Team member Christy has shared this flower related Frugal Friday Tip. She said, "a little while back, my son got a kit about using bottle caps to make craft projects. You can make a lot of neat things with bottle caps. In this "capsters" craft kit, they placed images, beads and anything you could think of. This got me to thinking of all the ways I could use bottle caps in scrapbooking. If you don't have bottle caps at home, that's ok. Craft stores sell them just for this purpose. You can also go into a restaurant and ask for them from their bar. They are usually willing to oblige. Just make sure you wash them and dry them well!
So here is what you will need: bottle caps, glossy accents(or a similar product), scraps of ribbon or paper, beads or anything else you wish to put inside your bottle cap, adhesive( I prefer glue dots for this project). If you want a scalloped daisy style flower...you will need a template (or if paper a punch) for scallops.Otherwise, strips of paper work fine. You can also use ribbon, crepe paper, felt, cloth,etc. *note, stiff paper may be difficult to work with. try this with a lighter weight paper first. I used K and Company paper for my example.
To get started, cut your scalloped strip of paper. Place a glue dot on the bottom of the cap and then begin folding/pleating the paper as you wind your way around the bottom of the cap. Apply adhesive as you go to keep your pleats in place.
Once you are finished, pour beads into the bottle cap or place whatever item you wish to go there. Then, fill the cap with the glossy accents. You will want to fill the cap to the top. This will help reduce any sharp edges the camp may have. You will need to let it dry fully before using it on your page or card.
If you wish, you can use a strip of paper or ribbon in place of the scalloped paper. The same principle applies...just keep adding glue and folding the paper or ribbon as desired. A second "ring" or set of petals can be applied under the first if you want more dimension.
This is a great way to recycle while using up scraps. You end up with a very unique flower.
So here is what you will need: bottle caps, glossy accents(or a similar product), scraps of ribbon or paper, beads or anything else you wish to put inside your bottle cap, adhesive( I prefer glue dots for this project). If you want a scalloped daisy style flower...you will need a template (or if paper a punch) for scallops.Otherwise, strips of paper work fine. You can also use ribbon, crepe paper, felt, cloth,etc. *note, stiff paper may be difficult to work with. try this with a lighter weight paper first. I used K and Company paper for my example.
To get started, cut your scalloped strip of paper. Place a glue dot on the bottom of the cap and then begin folding/pleating the paper as you wind your way around the bottom of the cap. Apply adhesive as you go to keep your pleats in place.
Once you are finished, pour beads into the bottle cap or place whatever item you wish to go there. Then, fill the cap with the glossy accents. You will want to fill the cap to the top. This will help reduce any sharp edges the camp may have. You will need to let it dry fully before using it on your page or card.
If you wish, you can use a strip of paper or ribbon in place of the scalloped paper. The same principle applies...just keep adding glue and folding the paper or ribbon as desired. A second "ring" or set of petals can be applied under the first if you want more dimension.
This is a great way to recycle while using up scraps. You end up with a very unique flower.
How fun is this. Why not try it on a project and share it with us here. We'd love to post it.
Do you have a frugal tip to share - send it to scrappinpsycho@live.com. You could be featured as a future Frugal Friday Tip.
August 11, 2010
August Challenge


Guest Design Team Member Malina submitted this layout for the August Flower Challenge. She said, "Inspiration can come from anywhere, especially when you are open to being inspired! My single page 12x12 layout, "Jack in the Garden" uses photos that I had planned for a different layout. It was my plan to read my now 3 1/2 year old son a few stories for bedtime, hope he fell asleep quickly and then get to my growing pile of projects for the night undisturbed. We read, "A Pocket Full of Kisses" (a follow up from "The Kissing Hand" and I strongly recommend both for anyone reading to children) and found the illustrations inspiring. To a little one the garden is full of surprises everywhere and this layout is not any different. The yellow flowers made of silk are adhered using eyelets (not something I ever did) and the butterfly and bee which literally pop off the page were cut from the "Tim Coffey" collection by K&Company. The little lady bugs are really antique hat pins that my local scrap-shop owner had brought home from a trip and only had a handful of...thank God I visit like every other day so I can see the new treasures she brings in, and usually buy. Perhaps the best surprise comes in the journaling and this is why I have submitted my layout photo with a split to show the journaling. There is a small light green leaf at the bottom of the tree hanging down to touch the photo. It actually has the word pull printed on it quite small. When you do pull down, a handmade journal tag drops down from behind the leaves and then smoothly slides back up to be hidden.
It was a very different type of page for my baby boy to be featured in and I appreciate the chance to share it with others through the Scrap Our Stash, August challenge which features flowers! The challenge is really inspiring my work this week, hopefully yours as well"!
See all the details on how you can take the challenge below in August Challenge.
Catch up Sunday on Wednesday
A lot has been going on here at Scrap Our Stash this summer. In July we had our first ever - Blog Hop! It had a Christmas in July Theme and was a lot of fun. We are still waiting for our Grand Prize Winner Amie Ricker to contact us at scrappinpsycho@live.com. So Amie if your out there please send an email with your mailing address.
Unfortunately, our DT member and Sketch designer Robin, has decided to step down from the Design Team. We will miss her, but hope at some point she will be able to return to the team. Hopefully, she will still send us her version of the monthly challenge occasionally.
We have also added 2 Guest Design Team Members to our Design Team. So, Ren Yi and Christy S. are both now full GDT members. They have both made some great contributions to the blog already, and I'm sure they will continue to be an inspiration to all of us. Welcome ladies!
Starting August 15th - we will have a new challenge here at SOS. It will be called Pagerize This. You will be encouraged to plagerize (lift, steal... whatever you want to call it) a layout. The challenge will end on the 14th and a winner will be chosen. The winner will then post their layout to be Pagerized. Watch for further details.
Make sure you check back in on a daily basis if possible, things change here daily. The best way to assure you don't miss anything is to sign up as a Follower. Also, how about getting involved in one or more of our challenges. All submissions are posted, and your submission makes you eligible to become a Guest Design Team Member. Check out all the details in August Challenge below. Also, don't miss our Frugal Friday Tips - these are posted every Friday, and give tips on how to stretch your stash. If you actually use one of our FF tips - we'd love if you would share them with us so we can post them here. Also, if you have a frugal tip you'd like to share - please submit it to scrappinpsycho@live.com . You could be featured as our next Frugal Friday Tip!
Later,
Kathy
Unfortunately, our DT member and Sketch designer Robin, has decided to step down from the Design Team. We will miss her, but hope at some point she will be able to return to the team. Hopefully, she will still send us her version of the monthly challenge occasionally.
We have also added 2 Guest Design Team Members to our Design Team. So, Ren Yi and Christy S. are both now full GDT members. They have both made some great contributions to the blog already, and I'm sure they will continue to be an inspiration to all of us. Welcome ladies!
Starting August 15th - we will have a new challenge here at SOS. It will be called Pagerize This. You will be encouraged to plagerize (lift, steal... whatever you want to call it) a layout. The challenge will end on the 14th and a winner will be chosen. The winner will then post their layout to be Pagerized. Watch for further details.
Make sure you check back in on a daily basis if possible, things change here daily. The best way to assure you don't miss anything is to sign up as a Follower. Also, how about getting involved in one or more of our challenges. All submissions are posted, and your submission makes you eligible to become a Guest Design Team Member. Check out all the details in August Challenge below. Also, don't miss our Frugal Friday Tips - these are posted every Friday, and give tips on how to stretch your stash. If you actually use one of our FF tips - we'd love if you would share them with us so we can post them here. Also, if you have a frugal tip you'd like to share - please submit it to scrappinpsycho@live.com . You could be featured as our next Frugal Friday Tip!
Later,
Kathy
Labels:
Catch Up Sunday,
special announcements
August 10, 2010
August Challenge

Reader Tina submitted this layout for the August Flower Challenge. Here is her description:
I love this pic and have been wanting to highlight it on a page of its own for awhile. I scraplifted this design from a sketch in a card magazine, Card Maker 9/10, and adapted it to a 12x12 page. I dug out all my old MM patterned patterns in coordinating colors and punched and stacked them to make flowers. I love the tone on tone look I built here in green which really pops out the bright red of the flower, since they are opposing colors on the color wheel. I also decided to anchor the flowers with eyelets being that I have a million of them and I'm trying to use them up for a change.
Now it's your turn to take the Challenge. Your project could win you a spot on the October Guest Design Team - see all the details in August Challenge below.
Labels:
August Flower Challenge,
Layout,
Reader Submission,
tina
August 9, 2010
August Challenge
My Boy by Libeeti

Guest Design Team Member Libeeti submitted this layout for the August Flower Challenge. She created the orange flower by herself, and here are her instructions:
I used a dispensable table clothe (but any fabric will do, preferably a thin one).
1. Cut 4-5 circles, in different sizes.
2. Put them in a cup with lots of glue (I used white plastic glue) and mix it so the fabric circles will be all covered with the glue.
3. Put them on a surface and spread stickles/glitter.
4. Let the circles dry well (take your time, cause it takes a lot of time...)
5. Adhere the circles on on the other, from the bigger to the smallest.
6. Crumple the circles and shape them to desired look.
That's it!
Enjoy.

Guest Design Team Member Libeeti submitted this layout for the August Flower Challenge. She created the orange flower by herself, and here are her instructions:
I used a dispensable table clothe (but any fabric will do, preferably a thin one).
1. Cut 4-5 circles, in different sizes.
2. Put them in a cup with lots of glue (I used white plastic glue) and mix it so the fabric circles will be all covered with the glue.
3. Put them on a surface and spread stickles/glitter.
4. Let the circles dry well (take your time, cause it takes a lot of time...)
5. Adhere the circles on on the other, from the bigger to the smallest.
6. Crumple the circles and shape them to desired look.
That's it!
Enjoy.
Now it's your turn - have you completed a flower project? Please share it with us, see all the details in August Challenge below.
August 8, 2010
August Challenge

Design Team Member Sara submitted this layout and tutorial for the August Flower Challenge. She said, "On this layout I created the peach flower and purple flower out of double stitched ribbon.
Here is the demo:
Selecte a wide double stitched ribbon and pick out 2 stitches from the
same side on both ends.
Pull the stitches and gather the ribbon to the middle so it scrunches
up.
Selecte a wide double stitched ribbon and pick out 2 stitches from the
same side on both ends.
Pull the stitches and gather the ribbon to the middle so it scrunches
up.
Pull the ends as tight as you want and tie them and then cut off the
excess string.
Here is the end result! Embellish it up with a center and you have a
beautiful flower every time!
Labels:
August Flower Challenge,
Layout,
Sara Z
August 7, 2010
August Challenge

Reader Irit sbmitted this layout for the August Flower Challenge. She Said, says she loves to make flowers. This is an altered canvas made as a frame. All but the smallest flowers are handmade either with tissue pater, crep paper, or crochet.
Now it's your turn to take the challenge. Just complete a project using flowers - and send a picture along with a brief description to scrappinpsycho@live.com See all the details below in August Challenge.
Labels:
August Flower Challenge,
Layout,
Reader Submission
August 6, 2010
August Challenge

Reader Kelly submitted this layout for the August Flower Challenge. She said, "Mine is a simple spiral flower. You basically take a circle, cut it into a spiral and then roll it up and glue to hold the flower shape. It is one of my favorite flowers to make as it is so easy to do, and it looks cute! You can roll it as tightly as you want and make the circle as large as you want!!! Easy peasy! Sorry no photos to show how to create the flower, but it’s really not that complicated!
Now it's your turn to take the Flower Challenge. Just complete a project with flowers and email a picture and a brief description to scrappinpsycho@live.com. See all the details in August Challenge below.
Labels:
August Flower Challenge,
Layout,
Reader Submission
August 5, 2010
$$Frugal Friday Tip$$
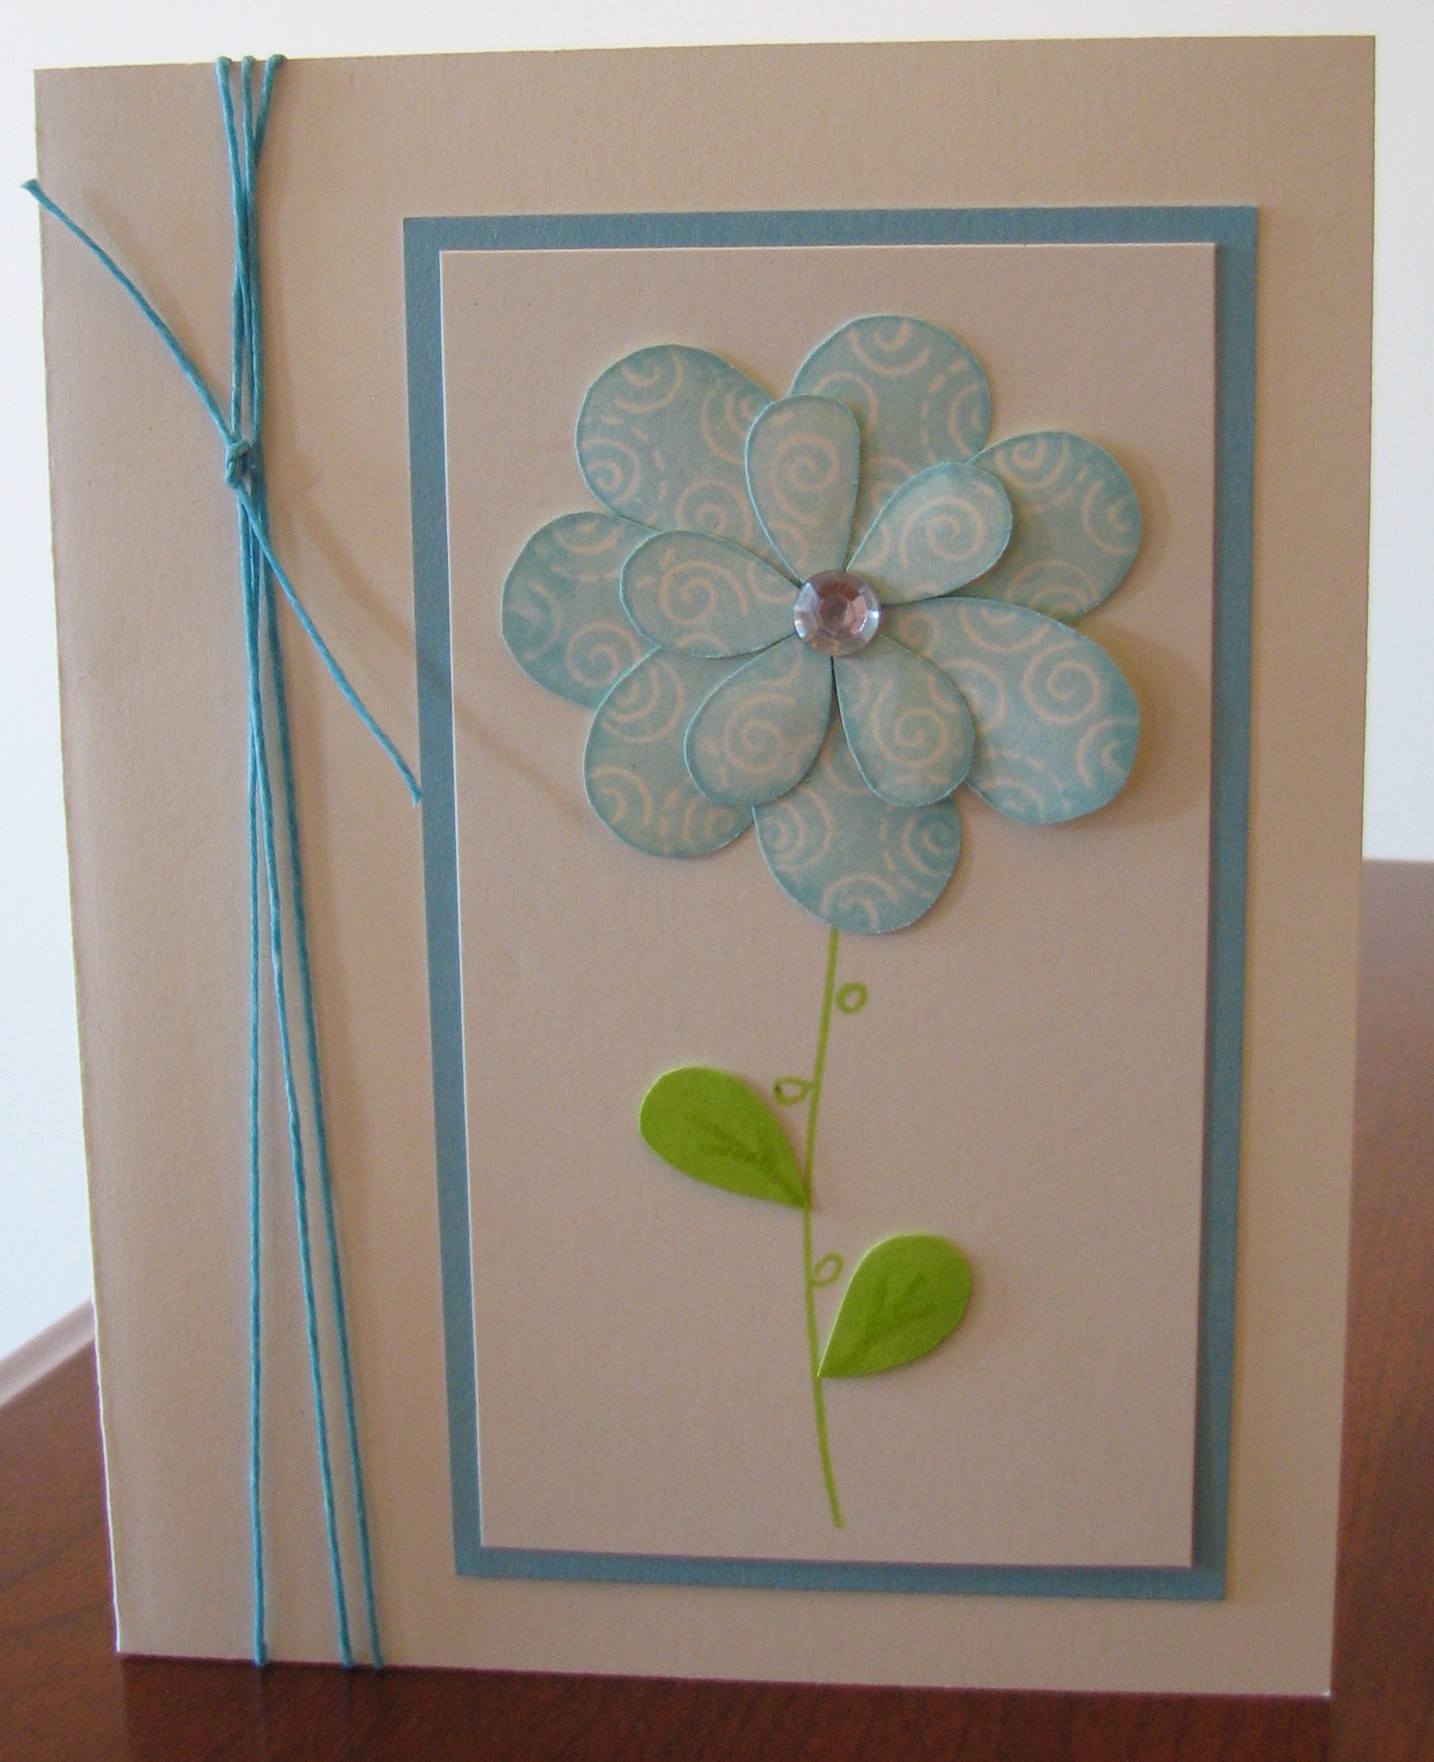
Design Team Member Wendy contributed this idea for the Frugal Friday Tip. She said, "Today I’m going to show you how to use stamps that you may already have in a new way to create some flowers and make the most out of your stamps!
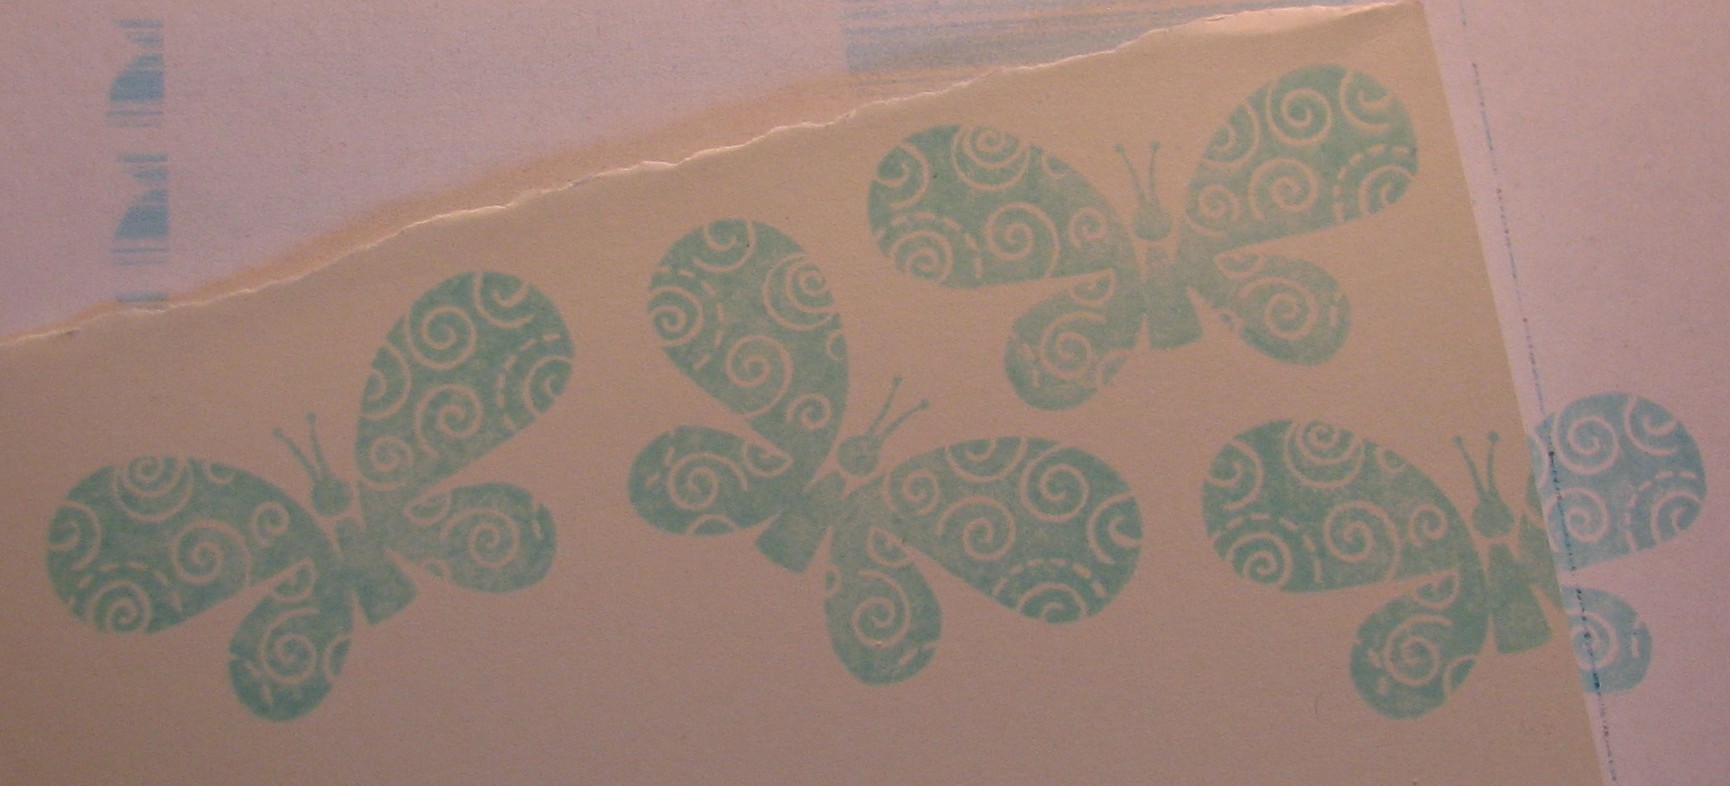
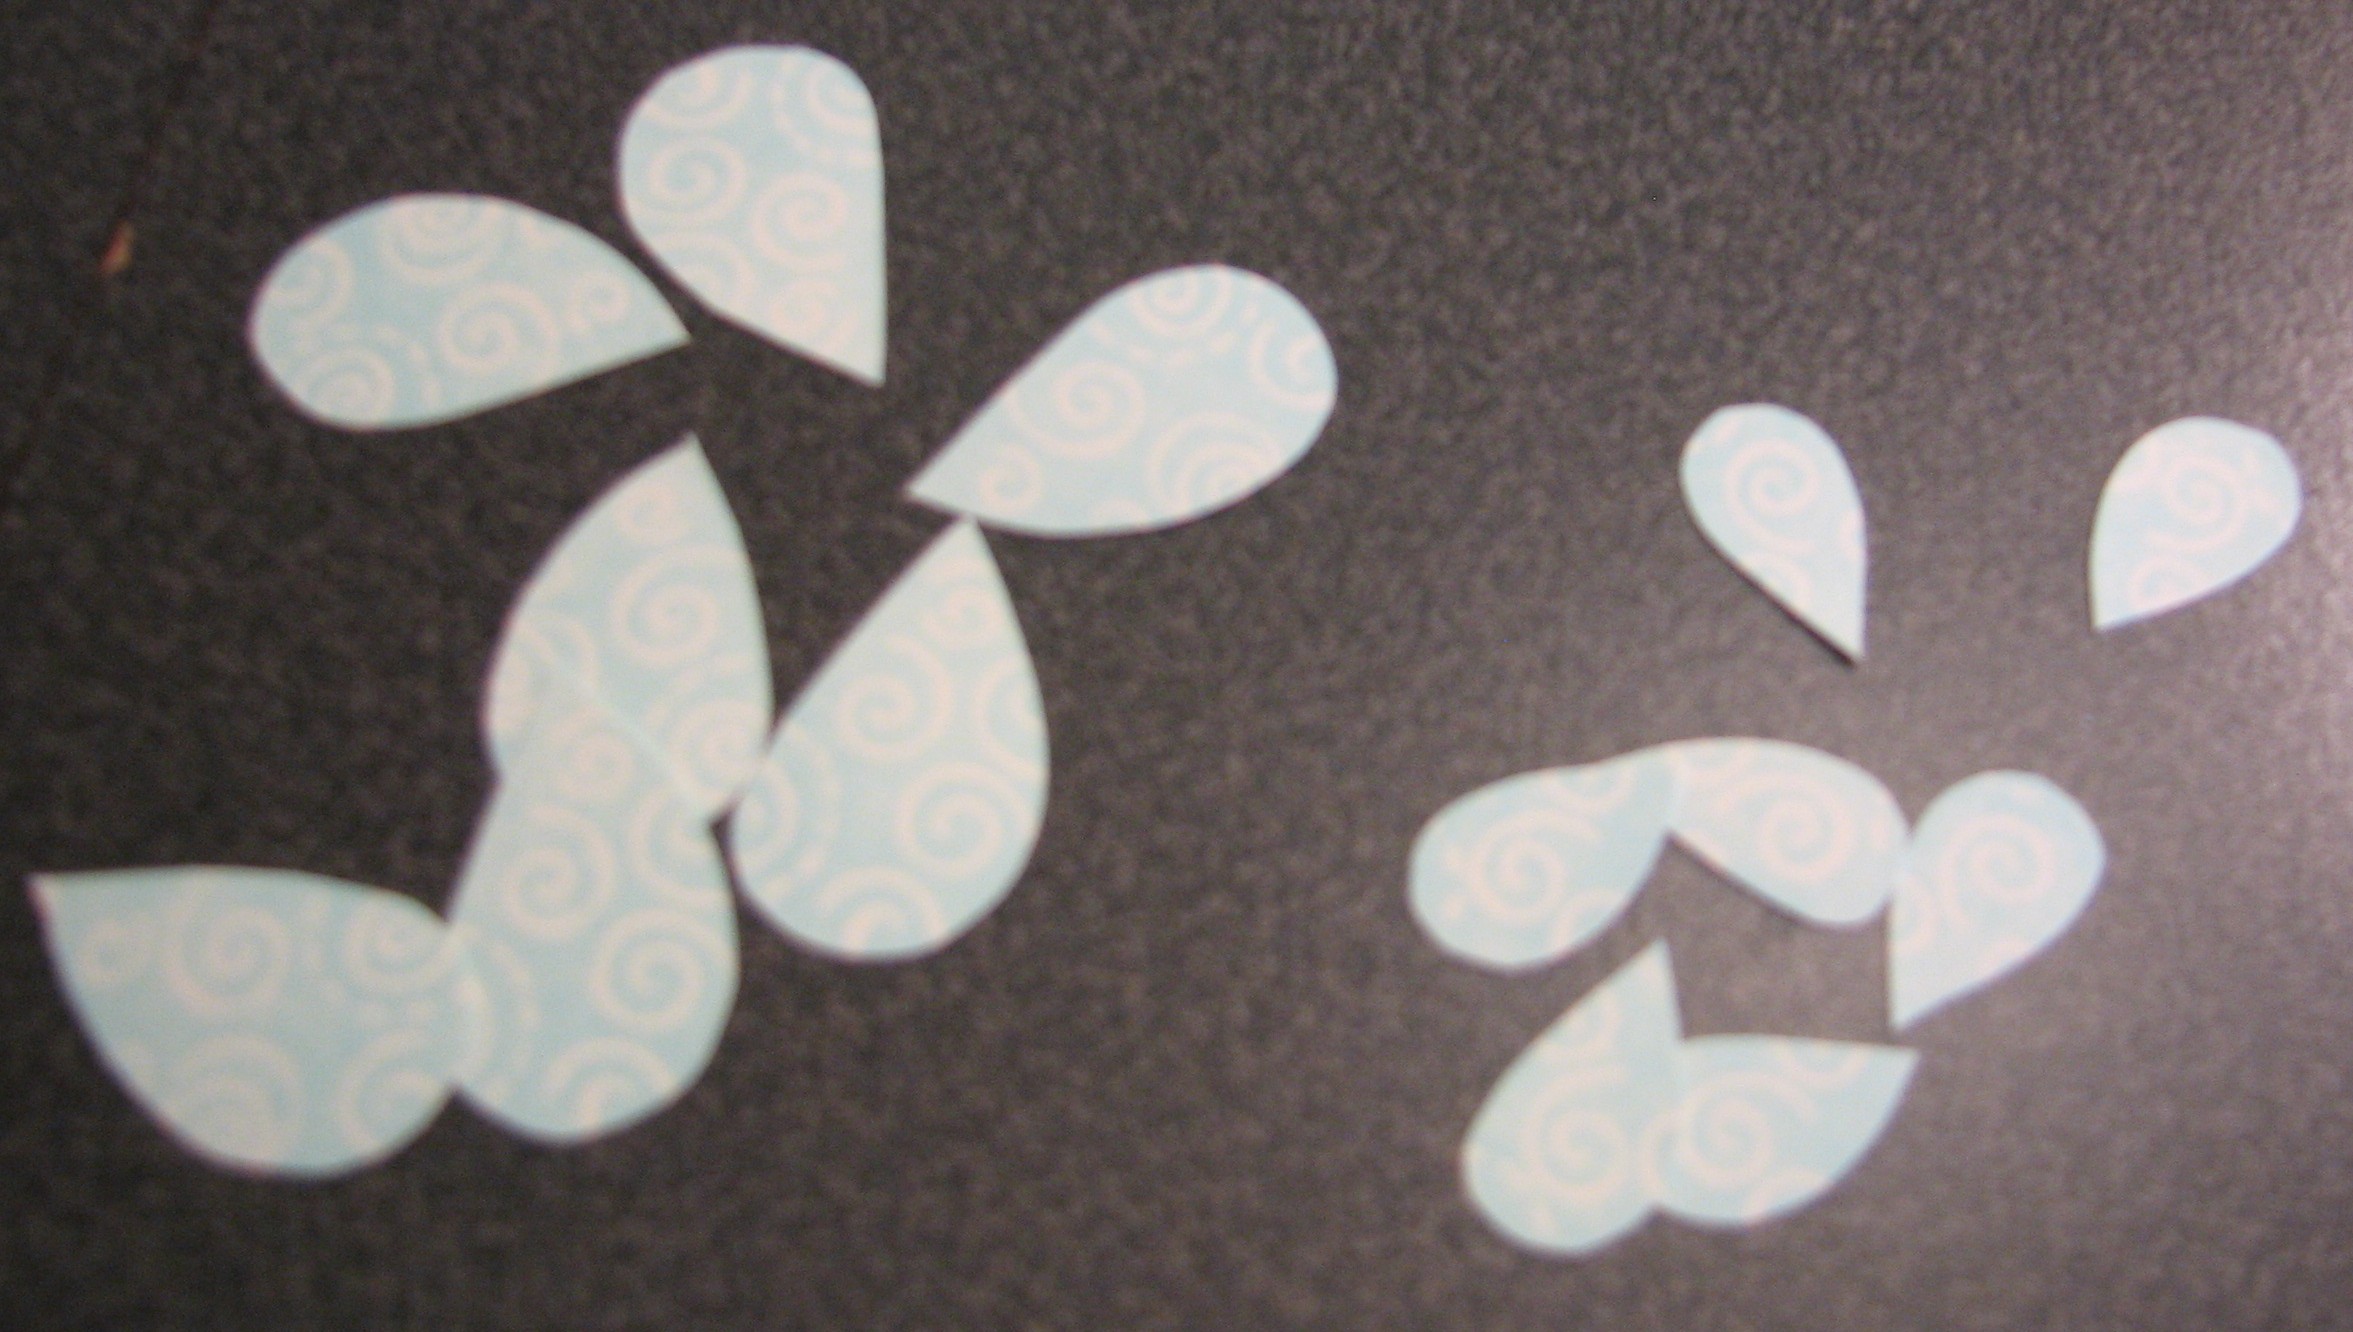
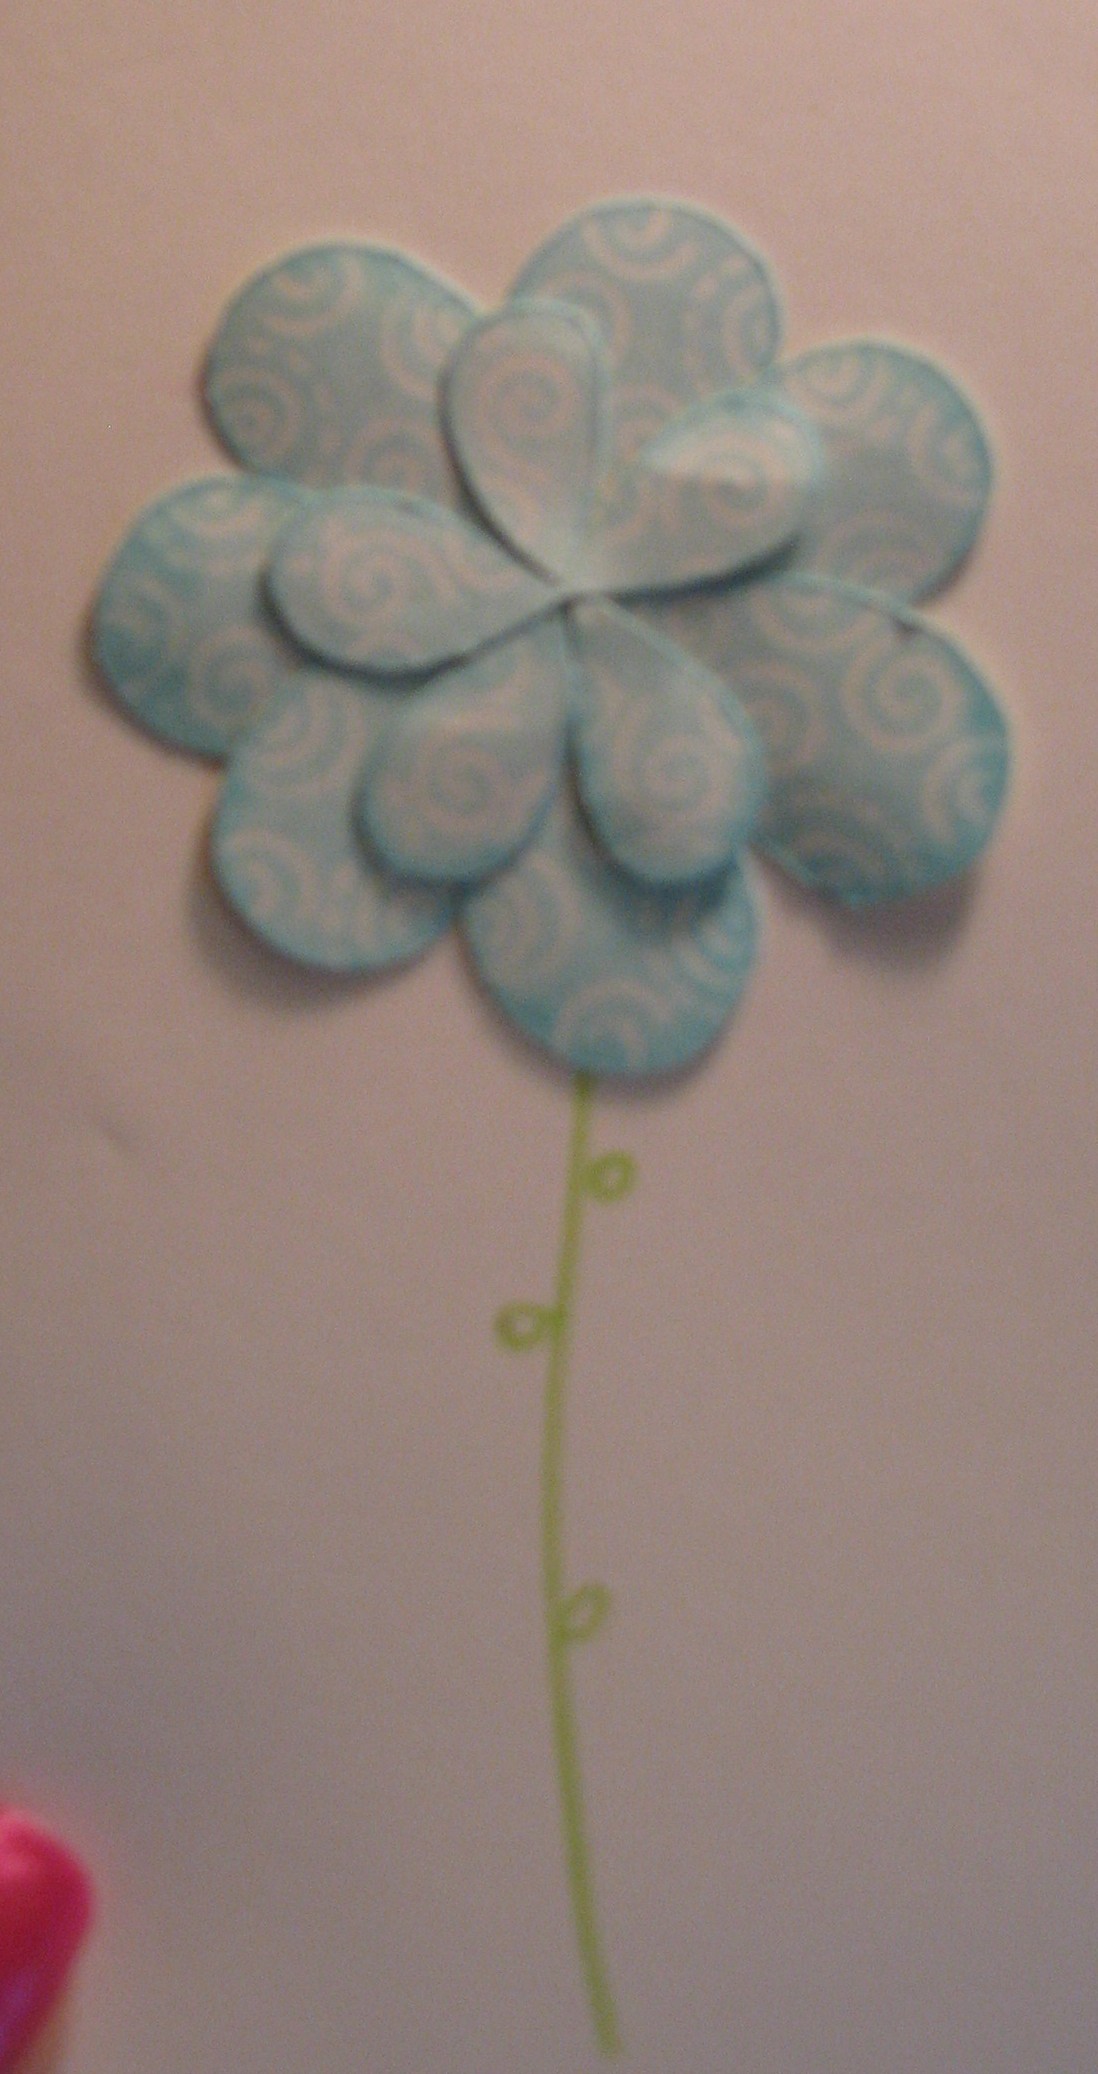
The first stamp I chose was a butterfly. It is very easy to transform butterfly wings into flowers. For those of you who are more visual learners , I took step-by-step pictures.
1. Stamp multiple butterfly images on scrap paper.

2. Cut out the butterfly wings, you can already see how they look like flower petals.

3. For this project I used another stamp for my stem. Flourish stamps also make great stems or bases for flowers. Next, I added some adhesive (a glue dot works well) to the top of my stem and added the petals. Just rearrange them until they are how you want them. Remember – flowers are not perfect so don’t sweat trying to make it look that way! Also notice that I inked the edges of each of the petals for more distinction. I chose to add both the small and large wings to my flower for a layered look but you could use them to create two flowers, a larger one and a smaller one.
One tip when making your flowers is that it is important to work with an odd number of petals, guaranteed that they will look nicer that way. I used 7 for my large flower and 5 for the layer inside.

4. Last, I added some finishing touches and made a card. See those leaves? Did you guess that those are leftover butterfly wings? I just flipped them over and inked them green!

Supplies used are all CTMH: Embrace Life Stamp Set, Crystal Blue and Sweet Leaf inks, Crystal Blue and Colonial White Cardstock, Crystal Blue Waxy Flax, Sponge Dauber, and Clear Sparkles.
Other stamps that work well to create flowers are hearts and I've get an Easter Egg stamp set that is fun to use. If your not a stamper, diecut shapes and punchies work well too!
We'd love to post your take on this tip - just send a picture of your project along with with details to scrappinpsycho@live.com.
Do you have a frugal tip you'd like to share? Send your tip, along with a picture to scrappinpsycho@live.com. You could be featured as a future Frugal Friday Tip!
The first stamp I chose was a butterfly. It is very easy to transform butterfly wings into flowers. For those of you who are more visual learners , I took step-by-step pictures.
1. Stamp multiple butterfly images on scrap paper.
2. Cut out the butterfly wings, you can already see how they look like flower petals.
3. For this project I used another stamp for my stem. Flourish stamps also make great stems or bases for flowers. Next, I added some adhesive (a glue dot works well) to the top of my stem and added the petals. Just rearrange them until they are how you want them. Remember – flowers are not perfect so don’t sweat trying to make it look that way! Also notice that I inked the edges of each of the petals for more distinction. I chose to add both the small and large wings to my flower for a layered look but you could use them to create two flowers, a larger one and a smaller one.
One tip when making your flowers is that it is important to work with an odd number of petals, guaranteed that they will look nicer that way. I used 7 for my large flower and 5 for the layer inside.
4. Last, I added some finishing touches and made a card. See those leaves? Did you guess that those are leftover butterfly wings? I just flipped them over and inked them green!
Supplies used are all CTMH: Embrace Life Stamp Set, Crystal Blue and Sweet Leaf inks, Crystal Blue and Colonial White Cardstock, Crystal Blue Waxy Flax, Sponge Dauber, and Clear Sparkles.
Other stamps that work well to create flowers are hearts and I've get an Easter Egg stamp set that is fun to use. If your not a stamper, diecut shapes and punchies work well too!
We'd love to post your take on this tip - just send a picture of your project along with with details to scrappinpsycho@live.com.
Do you have a frugal tip you'd like to share? Send your tip, along with a picture to scrappinpsycho@live.com. You could be featured as a future Frugal Friday Tip!
August 4, 2010
August Challenge
Not all who wander are Lost - by Kathy
This is a layout of my DGD. When I saw this saying - I knew exactly the picture to use.
I was very excited to finally make some handmade flowers - they seem to be all the rage these days.
I punched out 4 different size circles of patterned paper - and then just crumpled them - I actually kind of folded them into a cone shape - then I just stacked them smallest to largest and placed a brad in the center.
This is a layout of my DGD. When I saw this saying - I knew exactly the picture to use.
I was very excited to finally make some handmade flowers - they seem to be all the rage these days.
I punched out 4 different size circles of patterned paper - and then just crumpled them - I actually kind of folded them into a cone shape - then I just stacked them smallest to largest and placed a brad in the center.
Labels:
August Flower Challenge,
Kathy,
Layout,
tutorial
August 3, 2010
August Challenge - Marilyn

Reader Marilyn submitted this layout for the August Flower Challenge. She said, "I am excited because I have three boys and very RARELY get to use flowers. But I just finished this page and I thought it turned out very nice and I was looking for a challenge to try with it.
My flowers are homemade, sort of! :) I used ribbon,chipboard flowers, circles, paper flowers, buttons, and brads. I basically just layered different aspects together and covered some with patterned paper to get the effect I wanted. Again, I can't get too frilly or girly with these boys! I especially like the use of tiny safety pins as the leaves. I have lots of these pins but I have never found a use for them that I really liked. All products are from Close to My Heart".
Now it's your turn to take the Flower Challenge. Just submit a project in which you've used any kind of flowers. Email a picture of your project along with a description (or tutorial if you want) to scrappinpsycho@live.com. See all the details in August Challenge below.
Labels:
August Flower Challenge,
Layout,
Marilyn,
Reader Submission
August 2, 2010
August Challenge by Joni
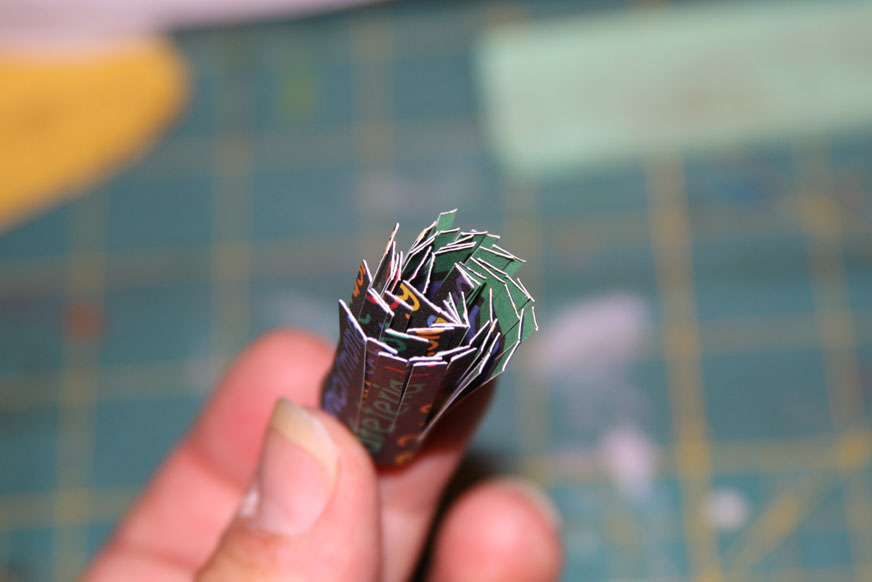
Design Team Member Joni submtted this layout for the August FLOWERS (preferrable Handmade), Challenge. She has also included a tutorial on how she made the "fringe" flowers.
1) Cut a strip of paper...mine is 12x1.5 -- Use double sided patterned paper
(and sorry that my mat is so dirty...it's very heavily used!!)
4) The bottom (non-fringe end) will look like this
5) I like mine to be a little "looser", so I release the pressure in my fingers and let the strip "unroll" a little (it just loosens up...) and now looks like this...
6) Back to the fringe cut end... put a glue dot on the "NON CUT" edge and finish the final roll and secure it.
The fringe end will look like this...


Here is a smaller flower on the left that i did and the larger one in the tutorial on the right. I used a stripe paper so you could get a good visual of the process.
1) Cut a strip of paper...mine is 12x1.5 -- Use double sided patterned paper
(and sorry that my mat is so dirty...it's very heavily used!!)
2) Cut slits fairly thin all the way down the length of the strip and be sure to go pretty deep, but careful not to cut all the way through!
This is what it should look like:
3) Start at one end and roll the strip until you get to the end...(do not adhere yet)
If you did not use double sided paper be sure the pattern that you want is on the inside that you are rolling into the inside (I rolled my stripes inside)4) The bottom (non-fringe end) will look like this
5) I like mine to be a little "looser", so I release the pressure in my fingers and let the strip "unroll" a little (it just loosens up...) and now looks like this...
6) Back to the fringe cut end... put a glue dot on the "NON CUT" edge and finish the final roll and secure it.
The fringe end will look like this...
7) Set the flower down on your table (fringe side up) and start opening the fringes with your fingers..

8) Keep opening until you get it all opened up and how you want it...you can even crumple it a little if you want. (I didn't crumple mine)

Here is a smaller flower on the left that i did and the larger one in the tutorial on the right. I used a stripe paper so you could get a good visual of the process.
Now it's your turn to take the challenge. You can either submit a project using any kind of flower or you can submit a project using one of the flowers shared in the tutorial. Just send a picture along with a description of your project to Scrappinpsycho@live.com. You could be chosen as a Guest Design Team member. See all the details in August Challenge below.
Labels:
August Flower Challenge,
Joni,
Layout,
tutorial
August 1, 2010
August Challenge

Guest Design Team Member Angie created this layout for the August Flower Challenge. She provided the following information on the creation of her flowers.
I cut my flower petals out of claudine hellmuth sticky-back canvas. Then I sprayed them with Glimmer Mist added a homemade dew drop in the center and there ya have it.Will you take the Flower Challenge. See all the details below in August Challenge.
Labels:
August Flower Challenge,
Layout,
tutorial
July Challenge OOOPS!
Love by Malina
Malina submitted two more projects for the July Brad / Eyelet Challenge - both were received before the deadline. Unfortunately, they went to my Junk email and I just noticed them. So here is the first one.
Malina said, I would like this single page 12x12 layout to be considered for the challenge this month. This layout is very special to me and it also gave me a chance to use some different heart shaped brads I grabbed on clearance after Valentine's Day. You will see a single white heart brad holding the ribbon to the page and 4 larger glitter heart brads in the 4 corners of the page.

Malina submitted two more projects for the July Brad / Eyelet Challenge - both were received before the deadline. Unfortunately, they went to my Junk email and I just noticed them. So here is the first one.
Malina said, I would like this single page 12x12 layout to be considered for the challenge this month. This layout is very special to me and it also gave me a chance to use some different heart shaped brads I grabbed on clearance after Valentine's Day. You will see a single white heart brad holding the ribbon to the page and 4 larger glitter heart brads in the 4 corners of the page.
July Challenge OOOPS 2
Ice Cream Cone by Malina


Here is the 2nd of the projects that got missed, due to them going to my Junk Mail.
Maline said, "I had a couple layouts that I wanted to submit. The last couple weeks I have been using up my stash and trying to do so in a unique or different way. Thanks for the chance to get creative with eyelets & brads. Hope you like my work and I always welcome critical feedback. This is actually a double page layout but I needed to submit them in seperate attachments, sorry) Page 1 used 4 red eyelets on the top border of pattern paper. Page 2 used 4 eyelets (red on the pattern paper border) and 5 brads (1 in each corner of the photo mat and an ice cream cone brad at the end of the journal for the 'ice cone' title).
Due to my error - and of course the fact that she deserves to be recognized for her work - I have decided to offer Malina a spot on the September Guest Design Team.
I'm sure you'll all agree!


Here is the 2nd of the projects that got missed, due to them going to my Junk Mail.
Maline said, "I had a couple layouts that I wanted to submit. The last couple weeks I have been using up my stash and trying to do so in a unique or different way. Thanks for the chance to get creative with eyelets & brads. Hope you like my work and I always welcome critical feedback. This is actually a double page layout but I needed to submit them in seperate attachments, sorry) Page 1 used 4 red eyelets on the top border of pattern paper. Page 2 used 4 eyelets (red on the pattern paper border) and 5 brads (1 in each corner of the photo mat and an ice cream cone brad at the end of the journal for the 'ice cone' title).
Due to my error - and of course the fact that she deserves to be recognized for her work - I have decided to offer Malina a spot on the September Guest Design Team. I'm sure you'll all agree!
Labels:
Brad/Eyelet Challenge,
Reader Submission
Subscribe to:
Posts (Atom)