Showing posts with label November Sketch Challenge. Show all posts

November 29, 2010

November Challenge

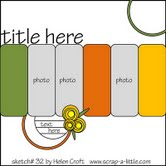
The November Challenge is to do a layout, using one of the sketches provided. All three sketches are by Helen Croft from Scrap A Little. You are not limited to only one entry and you are encouraged to Scrap Your STASH! 
To participate in the challenge just complete a layout using one of the sketches and send a picture of your layout to scrappinpsycho@live.com  along with a description and which number sketch you used.
All entries will be posted here at Scrap Our Stash and a winner will be chosen and given the opportunity to be a Guest Design Team Member for January here at Scrap Our Stash. All entries must be received by 6:00 PM central time November 30th.
Sketch #1
Sketch #2
Sketch #3
Posted by PicasaBe sure to check back regularly to see how our Design Team, Guest Design Team and other Readers have taken the challenge. 

November 28, 2010

November Challenge by Denise


Guest Design Team Member Denise submitted this layout for the November Challenge. She said, "I used this cute and fast sketch to get a couple of my Halloween pictures scraped. With Thanksgiving and Christmas coming up, I knew I needed to do these quickly. The haunted house, fence, and pumpkins are all from Reminisce. The paper is from Creative Imaginations and the letters are from Fancy Pants."


Now it's your turn to take the Challenge. See all the details in the November Challenge post below.
Posted by Picasa

November 27, 2010

November Challenge by Sarah Cooper


Reader Sarah submitted a second layout for the November Sketch Challenge.  She said, "For my 2nd layout for the November Challenge I used Sketch #1.

I really liked the almost 'film strip' feel down the center. I thought it would be perfect for Our TV Hero's Halloween Pictures. :O)
I stuck with the 3 pictures, the circles and the embellie 'bunch'.  Adjustments were made to accommodate the different width pictures.

All the Patterned Paper is Sassafrass Amplify, love how the 'busy' paper works so well with the 'action hero' theme. Busy Boy... Busy Paper!!! lol  The Power Ranger Logo was printed then mounted on black Card Stock.  Prima 'Say it with Crystals' in black, cut up and applied top and bottom of page. Brad Bling here & there, star buttons and a silver 'believe' buckle.
Journaling:
Octobert 31st 2010
Thomas turned
into the Red Power
Ranger for a night,
My Hero!


Full post and an additional Photo:
http://keepsakescrafts.blogspot.com/2010/11/scrap-our-stash-november-challenge-take.html
Posted by Picasa
Now it's your turn to take the challenge.  Submissions are due on Tuesday - see all the details in November Challenge - below. Don't miss the Pagerize This Challenge going on right now also, see the details in Pagerize This Challenge #4 below.  

How would you like a spot on our Design Team?  See all the details in Design Team Call - below or on the sidebar.   

November 26, 2010

November Challenge by Monica

Hi there! I love using sketches when I scrapbook, in fact I almost always use them! I orginally picked a different sketch to use but as I was starting this page I changed my mind. This is the sketch that I used.

I have been wanting to scrap these pictures for a year now, I love them!! Daniel is always outside with his daddy and wants a screwdriver in his hand! I could not pick just one picture for this sketch so I used two! The black lettering is a little hard to see on the top of the picture but I didn't want to take it all off.
I was able to use lots of my stash for this lo. I bought this paper over a year ago at a Scrapbook store that no longer exists. Also I wanted to add stars but didn't have any but then remembered that I have a Slice!!! lol Sure enough one of my cards had a star! I really need to use it more often!!


It's not to late to play along, submit your layout for the challenge soon.  See all the details for the November Challenge below.

November 25, 2010

November Challenge by Stacy H-W


Design Team Member Stacy submitted this layout for the November Sketch Challenge.  She said, "I took the opportunity to make this layout while I was in Bellevue, WA at CKC. I knew we would be going to the evening crops so I put together my own little "kit" of pp and embellies, I printed out the sketch and off we went.

I've been wanting to make a layout using some pictures I took of my kids bobbing for apples. A perfect fall activity (if you don't mind all the germs! lol).

Anyway, this sketch just seemed to work perfectly.

I decided to change out the flowers and use leaves instead. They just seemed to go so much better with the great Scenic Route paper I used. I used 3 of the Sonoma line, Oak Lane, Rosalie Street and Scrap Strip 3.

I found the fun chipboard leaves in my stash (not sure who they are from??) The chipboard alphas are from My Minds Eye, their Dear Santa collection. I just inked them with some brown ink to help make them stand out on the patterned leaf paper.

I added a few jewels from my stash. I put some Stickles on a few of the leaves and added that fun paper clip.

The die cut journaling paper is from a sweet notebook by Bo Bunny that my friend, Denise gave me.


So there you go, my take on the November sketch challenge. Where's yours?  See all the details on how you can take the challenge in the November Challenge post below.

November 24, 2010

November Challenge by Christy

 Recently, I bought a texture boutique. I have been wanting to have the ability to emboss. I love that I can use almost any brand name embossing folder in it. One of the things I stumbled across in my quest for embossing folders was a cricut kit to make your own embossing folder. Essentially, what you do is to cut a design on the provided sheets and then adhere the design to the plastic folder. This produces a custom design of your own.


What you will need: a cricut machine, the cricut embossing kit, 1 pack of extra sheets to cut( optional, but I highly recommend it if it's your first time. I messed up a few times and ended up using 3 sheets), a design to cut.

I HIGHLY recommend thinking out the design you want to use very carefully. Choose something you just can't find in an already made folder. I bought my embossing kit at Joann's for $10 and then another $10 for the spare sheets. So this can be an expensive folder to make. The design needs to be unique for it to be worth the cost. Also, I won't lie...this was a lot of work. At least for me on my first folder. I think my mistake was in choosing such a small design. I had these chipboard people and I had decided to make an embossing plate to match them. I found a dingbat font of a man, woman and boy holding hands...which matched my chipboard people perfectly. It was a small design though! So it took me 3 hours to make the folder!( now that I know what I am doing, it will be a lot less next time- I hope!)


Step 1: choose your design and set your cricut to do a double cut. I used SCAL and a dingbat font. I do not have a deep housing blade. One is not necessary if you use the double cut. I didn't use the double cut the first time...so I had to use another sheet. thank goodness I had some!

Step 2: carefully remove the design from the cutting mat. the negative space will be on one side, so you will remove the backing and adhere, then run it through your embossing machine to make sure it sticks.

Step 3: take the parts that were cut out, remove the backing and stick them to the opposite side of the folder. this is where I had some trouble. Take the image that was cut out and put it back inside the negative space, then remove the backing on the image. Run it through the embossing machine and it will stick...in the right place to the opposite side of the folder.
As you can imagine...with such small images, this took me quite some time. It was especially hard to get all the little heads poked out and then adhered to the folder. I do think it was worth my efforts though! I used one of the November sketches to make a title page for an album.

I embossed 3 sheets of carstock and inked the edges on colorbox black ink. I used naked chipboard from K and company and Maya Road. Basic Grey June bug embellishments were added for a hint of color. Hand stitching softened the hard colors of the red cardstock and making memories 5th avenue ribbons.In place of the photo, I used a sheet of vellum with the title for the album. The word family was a die cut given to me by a friend. To create a visual triangle, I used a silver hat pin slipped inside the stitching. It helped balance the silver on the chipboard people and the silver S( for our last name) on the tag. The silver S was a find at a thrift store. It was inside a tin marked We R memory keepers for $1. A great find as I have a lot of metal letters now. You can see that I shifted some of the sketch elements around to make it work for my page.

As far as the cricut embossing folder kit...I do plan to try it again. Now that I know what I am doing, I think it will take me less time and effort. I am very happy with the results of the folder I made. It's unique to me and to my page. That's what made it all worth it!

November 22, 2010

November Challenge by Sarah Cooper


Reader Sarah submitted her layout for the November Sketch Challenge.  She said, "I decided to use Sketch #2 with the Big Single Picture for William's Halloween Page.
I copied the 3 strips of paper but moved the photo over.  The Title 'Travel Log' is still there but the journalling is moved up under it.
I still have the 3 'clumps' of embellies.

This was a true Stash Dive Page!  I stamped the Boot Prints around the edges and across on the Card Stock base. (Stampin'Up!: Roughing It).  I've have had this sheet of patterned paper for 4 years or more, last of a kit.

I always have keys (luvs me some keys!) and used postage stamps around.

I really like how well the real stamps went over and around the ones already on the patterned paper.  The Magnifier 'Dish' has been in my stash for at least 3 years, last of a set of 3.  The squished fly sticker has been kicking around forever too... lol, I never knew what to do with a Flat Fly!

I always thought 'ewwwwww!' every time I'd run across it while digging.  I really love challenging myself to use what I have... this page was perfect for that!

Journalling:
October 31st 2010, The famed explorer William Russett set out in search of the treasure known as "Halloween Candy" in an ancient ritual known as 'Trick or Treating". It was a long cold journey but
he came back triumphant!
Posted by Picasa
Now it's your turn to take the challenge.  See all the details in November Challenge below.  Don't miss our Pagerize This Challege #4 or our Design Team Call - details below.

November 21, 2010

November Challenge by Missy


Guest Design Team Member Missy submitted this layout for the November Sketch Challenge.  She said, "I chose sketch number one to work with this month. This sketch was my favorite because I love the look of tall, skinny, photos. I was able to complete this layout with just two pieces of paper. The backside of one page was color blocked, so I was able to get the three colored panels from different parts of the paper. I hand cut and stamped the sun with flourish stamps. I embellished with a cluster of chipboard, Studio G stamps, and one of my new favorite tools, my i-Rock!!

Now it's your turn to take the Challenge.  See all the details in November Challenge below. 

Don't miss our Pagerize This Challenge - and our Design Team Call.   

Posted by Picasa

November 19, 2010

November Challenge by Christy

Design Team Member Christy submitted the following layouts for the November Sketch Challenge.  She said, "One of my biggest challenges is finishing off albums. It's not always the lack of scrap time. Sometimes, it is getting inspired by newer photos and moving on to new albums before one is finished. The sketches for the November challenge gave me the inspiration to complete some layouts in some albums that have awaited completion for months.
   The first sketch sprung to life in my mind as the title page for a spring album.


 I used the making Memories Panorama collection and some vellum. Since I live in a  tropical locale, this collection of papers was perfect!


I love the palm trees on the paper, but really hated the idea of covering them up. The stitched vellum panels still allows the design to show through while providing an anchor for the title block and embellishments. Since I used a collection of papers and embellishments, this page was made in a snap!


  I love using memorabilia on a page and I felt this 2nd sketch was perfect for some that I had from a recent trip to Planet Hollywood. I sort of adapted the sketch and my page is a very loose interpretation of it. I believe strongly that you make a sketch work for you...you don't work for the sketch.


The place mat was used as the base piece for the layout. I again used vellum to allow the design to show through. In this case, the vellum also helps tone down the loud design and colors of the place mat while giving me a place to fit in my journaling. The large vellum block and smaller vellum pieces are my interpretation of the hearts from the sketch.


Don't forget to use an archival mist on keepsakes like this place mat. I fit in 2 photos I had taken...one of us and one of the restaurant. I moved them down a little to cover the stock photos on the place mat. I also used a found VIP coupon as the title block.I will say that I love the quick versatility of embellishing with a hat pin. The silver pin through the prima flower gave it a little extra something I felt the title block was missing. I handstitched around the drink glass my son got as a souvenir (since I did not have good photos of it) and then added some glossy accents to make it pop more.


Using a collection of items and sketches provide a fast easy way to get pages done. If you don't buy kits or items from a  collection, you may want to try sitting down and making up little kits with items from your stash. You may find that you create some pages you love in a short amount of time.

Now it's your turn to take the sketch Challenge.  See all the details in November Challenge below.

Don't miss your chance to apply for our Design Team - see all the details in the sidebar.

Our Pagerize This Challenge is a fun way to lift someone else's creation.  Check out all the details in Pagerize This Challenge #4 below.   

November 18, 2010

November Challenge and Example of a Frugal Friday Tip by Stephanie

Design Team Member Stephanie created this layout for the November Sketch Challenge.  She used a modified version of sketch #1 for the November challenge.   She said, "When I saw the sketches, I knew that I had the perfect moment to scrapbook! These three photos are from our trip to Disneyworld in February and I fell in love with the castle. (Unfortunately, I don't think the hubby would like a book filled with castle layouts!) I knew I needed to make it into an 8x8 which is why I modified the number of images, but there was something else that struck me.

While creating this layout I just knew that I was going to need the perfect "Thickers" to give my title the right emphasis...so, I made my own! I Used a previous Frugal Friday tip that drew me to the SOS Blog! I chose my favorite magical feeling font (It's a Sizzix font called Sunset) and some fun, silver, glittery, self-adhesive foam and created a custom title for my page. The remaining elements are cut from self-adhesive metal that I colored using my Copic markers. In the end, I ended up with a truly homemade, cost effective, memory capturing page! Perfect for someone who just received their first student loan bill in the mail, no?


If you haven't had a chance yet, pull out those crafty supplies and play! There's plenty of time to get in on the November challenge!


-Steph


As always, you can find more details about my layout on my blog.

And don't miss the Pagerize This Challenge - see all the details below.

November 16, 2010

November Challenge by Malina


This month's challenge requested that we complete one of three assigned sketches but I chose to do a double layout highlighting the Crop for a Cause which my company, Reflections Keepsakes partnered up with LSS Rochester Scrapbooking Co. to host. In order to stick with the challenge requirements I chose to use two of the sketches and combine them to create a single sketch. I am a huge fan of Becky Fleck who encourages designers to think outside the sketch and manipulate the sketch to meet the needs of the design.


Well, I needed to include some memorabilia such as the thank you card from the organization we were raising funds for and I decided to include the thank you gift and card my business partner and I provided all the Croppers. I also did not have a vertical image so I worked from a horizontal photo. Instead of journaling I made the card my journaling. Instead of flower embellishments I used the keepsake. The title on this page is for the Crop for a Cause we hosted but then I wanted to take it a step further and share what the crop inspired. For the second page and second sketch I really manipulated my images to fit into the design and utilized the sketch journal area to include the sentiment I had written for the cards Reflections made for women to give to other women as a reminder to get a breast exam. This side of the layout tells the second half of the story, after the crop for a cause.


"Pink Scrappers for "Green Papers" became a month long project in which I and my business partner invited the Rochester local scrapbook stores, Rochester Scrapbooking Co. and VIP Scrapbook Gallery' as well as Rochester based internet company Wigham Designs, to raise as much "green paper" as possible for the direct benefit of Breast Cancer patients & their families living in our own community and the Join the Journey organization (learn more about them at http://www.jointhejourney.org/). I needed the story but didn't want to take from the sketch design and so I used the pattern paper panels as well as the first set of photos to hide my journaling. When each panel is lifted the story of Pink Scrappers is told and on the back of each panel I have documented specific things I want to remember such as how much we raised, or specific activities or people associated with the project.


Visit me at http://www.reflectionskeepsakes.blogspot.com/  after November 15th to learn more about what this project accomplished and what it continues to accomplish and how you can be inspired!

To see all three sketches for the challenge and the details as to how you can take the challenge - see November Challenge below.
Posted by Picasa

November 12, 2010

November Challenge by Irit


Guest Design Team Member Irit submitted her take on Helen's sketch. She said, "I used the first one photo sketch #2 and did a pretty "unscripted" take of it. I used butterflies and not flowers, used a journaling enevelope and not a real journaling spot here
I also added some recycled items. I altrered the green Prima packaging with crystals, used some white crackle paint on the 3 brown chipboard birds, and did some faux white pen stitching, a lot of inking and used a 3 part title.

Now it's your turn to take the November Sketch Challenge - see all the details in November Challenge below.
Posted by Picasa

November 10, 2010

November Challenge by Amy

Design Team Member Amy submitted this layout for the November Sketch Challenge. She used Sketch #1 and this is what she said.

When Kathy announced the challenge for November, i knew i had the perfect pictures for the sketch! I was already envisioning it in my head. :) Previously, i bought Photoshop Elements 8 and have been playing with editing my pictures. I've been focusing on getting more than one photo on a 4x6 photo. These photos were edited to 2X6 size and, therefore making it one print with two photos on it. So, having these on hand made it perfect for this sketch!

I really loved the circle elements, so i decided to make a "stencil" and mist around it. Then i layered my pictures and added all of my embellishments.
Supplies: Cardstock: Bazzill; Patterned Paper: Basic Grey; Mist: Glimmer Mist, Tattered Angels; Punch: Ek Success; Ribbon: Offray; Letters: Echo Park (blue), American Crafts (brown); Flowers: prima; Gems: Queen and Co; Chipboard: Maya Road; Heart: Me and My Big Ideas; Corner Rounder: Marvy Uchida; Pen: Zig, EK Success.

Now it's your turn to take the Sketch Challenge. Just pick one (or more) of the sketches and send a picture of your layout to Scrappinpsycho@live.com along with a description. You could be chosen to be on our January Guest Design Team. See all the details below in November Challenge.

And don't miss our Pagerize This Challenge - complete your version of Christy's layout and you could become our next Pagerizer! See all the details in Pagerize This Challenge below.

November 9, 2010

November Challenge - by Joni

Joni used paper from Crate's Restoration line and Echo Park to make this distressed layout and silly picture of her son!   She also dug some old Rub-ons out of her box for some extra fun bugs.
Now it's your turn to take the November Sketch Challenge - see all the details in November Sketch below.

November 7, 2010

November Challenge by Karen W.


Posted by PicasaGuest Design Team Member Karen Williams used sketch number one for her layout.  She said, "it just screamed out to be a rainbow so I used most of the colours and used Arthur's T-shirt for the indigo.  I love this sketch and have plans to flip it around and have the bars going down the page.

Now it's your turn to take the Sketch Challenge.  See all three sketches and all the details on how to submit your layout, and be eligible to become a Guest Design Team Member in the November Challenge Post below.
And don't miss our Pagerize This Challenge - see details in the Pagerize This Challenge below.

Do you have a Frugal Friday Tip to share?  How about a Show N' Tell Sunday?  Check out the Frugal Friday Tip and the Show N' Tell Sunday posts below. 

November 3, 2010

November Challenge by Libeeti


Sketch #3
Posted by PicasaDesign Team Member Libeeti used sketch #3 for the November Sketch Challenge.  She said, "I used sketch #3 with the hearts, with some liberty...


Now it's your turn to take the challenge.  Complete a project using one of the sketches in the November Challenge.  All entries are posted here on the blog - and are eligible to be chosen as a Guest Design Team member for January.  See all the details in the November Challenge post below.

And don't miss the Pagerize This Challenge below.

November 2, 2010

November Challenge by Joni

Sketch #1
Joni used a kit from one of her monthly kit clubs to create this fun layout of her son jumping into a foam pit.  She added the J & 7 from a deck of cards (J=Joseph & 7 this was at his 7th birthday party).

Now it's your turn to take the challenge.  See all three sketches and all the details on how you can become a Guest Design Team Member here at Scrap Our Stash  in the November Challenge - below.